iOS8 Simulator – Documents Directory

Update 8.1.3: Someone at Cupertino just can’t make up their mind. With the release of 8.1.3 the path for the documents directory changed yet again from:

~/Library/Developer/CoreSimulator/Devices/<SIMULATOR YOU WANT>/data/Containers/Data/Application/<APP YOU WANT>

to,

~/Library/Developer/CoreSimulator/Devices/<SIMULATOR YOU WANT>/data/Applications/<APP YOU WANT>

 tl;dr: Download the app. Run it to open the most recent application’s documents directory.

Upto iOS 7.1, the iOS simulators were located under

~/Library/Application Support/iPhone Simulators/

where you would be presented with a list of all the simulators you used. You can read more about it here. iOS 8 changed the directory hierarchy of the Simulator Devices and its Documents directories. Simulators are now located at

~/Library/Developer/CoreSimulator/

But there is another surprise. Instead of being presented with a human readable list of simulators like this,

Screen Shot 2014-11-28 at 3.24.45 pm

we now get gibberish

Screen Shot 2014-11-28 at 3.27.33 pm

Apparently, Apple thinks simulator names are too confidential to reveal to app developers. (before you get your chaddi in a ganth, I am just kidding. I am sure there is some perfectly reasonable explanation for this) Basically, we now have folders with UUIDs for names that we can’t map to anything. Assuming you are only interested to get into the device simulator you were most recently working with, a workable solution is to sort them by modified date in list view. Screen_Shot_2014-11-28_at_3_38_25_pm

In my case I can safely assume that 7B2CF1B3-1820-4313-B010-A4CCD4764D10 is actually simulator folder for iPhone 6 plus – 8.1 that I was just testing.

Next – Locating the Applications

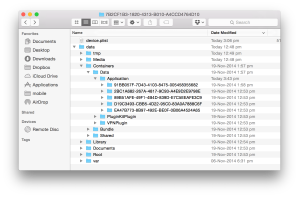
Locating the application is another run through the maze. Inside your simulator folder you will find a structure like this

Screen Shot 2014-11-28 at 3.44.01 pm

The applications are located under

/data/Containers/Data/Application/

Here you can again sort the list by ‘Date Modified’ to get you most recent app on the top. The rest of the structure remains unchanged. So now you can just create an alias (shortcut) on you desktop and… STOP. YOU CAN’T! Because on each run of your app, the directory name for your app changes.. wow! You will have to do a circus everytime you need to inspect the documents directory of your current app. Unless you want to be awesome that is. And you can do that by writing a script, which

  • Navigates to the CoreSimulators/Devices directory
  • Sorts the results by ‘Data modified’
  • Picks up the latest one.
  • Navigates to ../data/Containers/Data/Application/
  • Sorts the results again
  • Picks up the latest one.
  • opens that directory in Finder.

You can find my script here if you want a guide, other wise just go for the directly executable app –

Download Executable App

Like other script apps the best way to use this app is to put it in some folder and just forget. You can launch it directly from spotlight every time you want to open the Documents directory.
YouTube iOS Framework

It’s almost 2015 and while we are close to the hoverboard dream, but integrating YouTube API still seems to be stuck in 2012. Starting iOS 8, we have full(almost) support for Frameworks and I think a service like YouTube is a perfect fit. Although Google seems to be taking its own sweet time to release one, here is something you can work with in the mean time.

It’s a Framework which bundles the libGTLTouchStaticLib.a provided by google-data-api along with the resources, framework and other files and settings required.

Frameworks are only available on iOS 8. If you are targeting a previous versions this link will be helpful.

Also, this is still a work in progress so there are a few limitations

  • This framework targets an actual device, and will not work on simulator. I am trying to generate a universal Framework but the GTL project form Google just does not give me a universal binary… very frustrating :(
  • I was not able to bundle the required .xib file as a part of the framework, so you will need to add that manually.

First you need to set up your app on Google Developer Console. If you need help regarding this, follow the Step 1 here.

Next download the Framework zip from this link or from GitHub. Inside this zip you will find:

  1. YouToobAPI.framework: This is the framework which contains all the google data API code. It also contains a helper class, YouTubeHelper, written by me to work with the google API. To take a look at the class and its implementation you can download the files here.
  2. GTMOAuth2ViewTouch.xib: This xib is a part of the google API. Ideally this should have been a part of the Framework, but at the moment I just could not find a way to do that.

Ok so now we have everything we need, lets test this out.

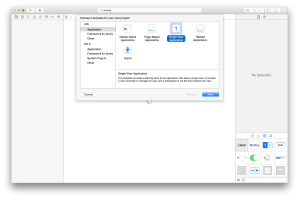
Create a new project in Xcode. Lets go for a simple Single View Application template.

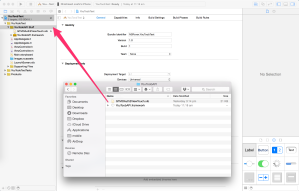
1. New Project

Next, create a group for the framework and xib in you project and drag-drop these files into this group. Make sure you select the ‘copy if needed’ checkbox.

2. Add files

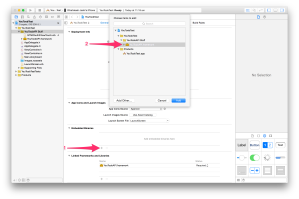
Go you your project settings and select the target. In the general tab, you will see our framework listed under the ‘Linked Frameworks and Libraries’ section. Thats good, but we also need to tell Xcode to treat it as an Embedded Binary. So click the ‘+’ button under ‘Embedded Binaries’ and select the framework.

3. Add as embedded binary

4. Added embedded binary

Try a build now, if all went well we should not have any errors. This is about it. Our project is ready to start talking to YouTube service. Currently the only usable class exposed by our Framework is YouTubeHelper. But for the sake of this tutorial and most common tasks, that is sufficient.

Go to the view controller .h file and

#import <YouToobAPI/YouToobAPI.h>

This will also expose the YouTubeHelper class to your view, you don’t have to import it separately.

Also make your view controller conform to the YouTubeHelperDelegate protocol.

@interface ViewController : UIViewController

Next we need to implement the protocol methods and start taking to YouTube service.

In your view controller, .m, create a property for YouTubeHelper.

#import "ViewController.h"
@interface ViewController ()
@property (nonatomic, strong) YouTubeHelper * youtubeHelper;
@end
@implementation ViewController
...

We can initialise this property in viewDidLoad:

self.youtubeHelper = [[YouTubeHelper alloc] initWithDelegate:self];

Next we need to implement all the required delegates:

- (NSString *)youtubeAPIClientID {
    return @"YOUR_CLIENT_ID";
}

- (NSString *)youtubeAPIClientSecret {
    return @"YOUR_CLIENT_SECRET";
}

- (void)showAuthenticationViewController:(UIViewController *)authView {
    [self.navigationController presentViewController:authView animated:NO completion:nil];
}

- (void)authenticationEndedWithError:(NSError *)error {
    if (error) {
        NSLog(@"Auth failed with error: %@", error.description);
    }
}

Ok, we are all set up. From here you can start calling the methods in YouTubeHelper.

The first thing you will need to do is authenticate. Once that is done, you can be sure your app is communicating successfully with the API. Add a button to your view controller and in its selector call:

[_youTubeHelper authenticate];

You will notice that we are presenting the auth view though navigationController. Either you can change that or since we are using the ‘Single View Application’ template, we will need to embed our view controller in a  navigation controller. Open the storyboard, select your view controller.

5. Embed in navigation

Go to Editor > Embed In > Navigation Controller. This should make your view controller a child of a navigation controller.

Screen Shot 2014-11-18 at 1.01.32 pm

Ok now go ahead the test the authenticate function. You should be presented with a Google Sing In view.

For more functions of the YouTubeHelper class, like uploading a video, follow Step 4 here.

Quickly toggle Invert colors on OS X

tl;dr — download the app here.

(If you are on a slow machine, this may not work for you. But fear not, read on and you can build one that does.)

Some times,

DarkMode

just make a lot more sense to me than,

NormalMode.

If you have times like these too, OS X has an Invert colours option. Unfortunately it is buried layers inside System Preferences.

I need to switch between the modes often, depending on the kind of work I am doing. So I wrote an executable script (another word for an app) which can be run directly from spotlight.

invert_execution

Download the app from here. Place it anywhere on your system you want (provided that location is indexable by spotlight). You can be creative and rename the app anything you want. Just make sure that name is unique enough to come up on top in spotlight.

Since this app momentarily takes control of your system, the first time you try to execute it you will be asked to set permission for it. Open System Preferences > Security & Privacy. Here you will see the app listed.

  • Trust me
  • Unlock preferences
  • Check the app

Screen_Shot_2014-11-14_at_10_59_24_am

Unless you do not trust me, this should do it, go ahead and have fun. If you are suspicious of me, lets build one together :]

Launch ‘Script Editor’. This is the IDE we will use to write, compile and execute our script.

First, lets try and get our script to open the System Preferences window and navigate to Accessibility screen. Type in this code:


tell application "System Preferences"

activate

set the current pane to pane id "com.apple.preference.universalaccess"

end tell

Hit the play button on top to execute the script. Unless you had a monkey on your keyboard, this should open the system prefs and navigate to Accessibility(historically referred to as universal access) screen.

Next, lets look for the ‘Invert colors’ checkbox and toggle it.


delay 0.1

tell application "System Events"

tell process "System Preferences"

if (exists checkbox "Invert colors" of window 1) then

click checkbox "Invert colors" of window 1

end if

end tell

end tell

You will notice we put up a delay, this gives time for OS to actually finish launching System Preferences.

In case you are on a slow machine you may want to change this to a higher value.

Run it again, if everything goes as planned, you should see your world with inverted colours now. But we still have the system prefs open. Lets add code to close that as well.


tell application "System Preferences"

quit

end tell


The script is now ready, all we need to do is create an Application from it. In Script Editor, select File > Export… Give your app a name. Under File Format change ‘Script’ to ‘Application’. Done.

If you modify this script to do other cool things with the system prefs, do let me know.